Selasa, 29 November 2016

Generator Update

The new drive plate has been made and fitted.


Once the drive plate and new support frame was fully bolted into place a final dial gauge test was done. On the end of the shaft there was 5/1000th of an inch runout. This shaft will be cut back on final assembly to about 11/4" (30mm) when the HRC90 coupling is fitted. This will reduce the runout even more. The coupling is designed to take way more runout than this.

This video explains better than I ever could how the taper lock system works.


Read More..

Sabtu, 26 November 2016

Getting on with things

Boat building has stalled in the last few weeks as I realize that the raising of each frame will bring the project one step closer to completion or calamity. At this point, Im not sure which it is going to be and am thus reveling in a rather blissful ignorance. When the frames do go up next week (!), I will know once and for all whether Luna will be a beauty or a god-awful mess. The quality of the lofting job I did over a year ago will be put to the test when I can use a batten to check the three-dimensional curvature of the chine and sheer.

The last couple of days have seen me drinking a lot of wine, eating a lot of tamales, avoiding the boat shop,and over-analyzing each step Ive taken to get to this point. For each part of the project there were setbacks and things that didnt turn out quite like Id imagined (these lessons have been mentally filed under "The Next Boat"). After spending a lot of time before each new step thinking about what could go wrong, I realized that the sooner I could deal with what went wrong, the better. Id stall before each new venture (just as Im stalling now), think about various outcomes and contingencies, and ultimately had to decide to just do it. Just take a chainsaw to that keel piece you spent a week in the hot sun laminating. Just run a Skillsaw down the side of  keel. Just buy that planking even if you arent sure itll wrap around the hull. Just use that adhesive even if its not proven. Just glue this piece on that piece and bolt it to this piece.

Just build the boat.


Read More..

Kamis, 24 November 2016

Bending the Shears

The first step to the shears was getting the length down to about 18" longer than what I measured to be required. Since the fit of the shear to the breasthook is a set angle, I cut some scrap material on my mitre saw until I got it right and then cut an angle on the front of each piece to mate with the breasthook. The four shear pieces (two layers each) were then soaked in the stairwell soaking tube for a couple of days.

I worked on the one side of the boat where I had the most room between the boat and the wall. To support the shear while bending into place, I clamped long boards to the form or the frames over to the wall, just below the level where the shears would meet the frames. This provided a resting place for the shear while bending into place. I then wrapped a bath towel around the shear along the area of the stem and another in the area between the front and middle frame. I then poured hot tap water over the towels (buckets underneath).

To start the bend into the breasthook, a 24" Bessy bar clamp was clamped to the shear to provide leverage and the leading end was bent while the remaining length of the shear pushed up against the wall about 3 away from the boat. After shoving it into place and the breasthook clamp board squezzed tight, the rest of the bending took place at the rear end of the boat. A pipe clamp was put on the shear near the transom and used to gradually bring the shear towards the boat. After pouring another pitcher of hot tap water on the towels, the shears were gradually moved into place up against the frames and clamped in place. Towels were removed and the shear left to dry. After a day of drying, the first shear was removed and moved to the other side of the boat where I did not have as much room to work. I repeated the process for the next two shear pieces. Unfortunately I did not take any pictures during this process.

While pulling the third shear piece into place, I heard a loud crack and looked up to see a distinct sharp angle forming inside the towel, just aft of the breasthook. Another crack or two later and several expletives, the break was complete. I backed off on the bending process because this shear was toast. I removed the towels, the clamps, and put the shear aside for later analysis. I grabbed the last shear piece out of the soaking tube and bent it into place without incident. Analysis of the broken shear showed a severe grain run-out in the area. I thought I selected all pieces to put the staightest grain towards the front of the boat, but I got this piece backwards. I decided to make a scarf cut in the broken area and mend this piece back together putting the scarf joint at the back of the boat. After the piece dried, I made a jig for my chop saw and made about a 5" long scarf joint in the shear and epoxied that sucker back together. After curing, joint clean-up, soaking and bending, I was back on track with all four shears bent.

Prior to gluing the first layer of shears to the frames, I made a mid bow area temporary "spreader board" to ensure the contour was similar on both sides. One side measured wider from centerline and the curve did not look as smooth as the other. The way my stem support was made, I had a level surface to center and mount this board. The first layer of shears was glued to the breasthook and frames using clamps to the temporary spreader to force the curve in place on the one side. Then the second layer was epoxied to the first layer and clamped into place. Screws were only used in the breasthook.

Read More..

Progress Again

I now have all the steering system hydraulics fitted.  Flow and return pipes have been run from the steering pump to the ram and with the help of my wife turing the wheel to order the system was filled and bled. Here is the helm pump.  I have removed the wheel again as its sure to get damaged.


I have also fitted the an external 13a socket, the 16a power inlet, 12v switch panel, locker doors and the red bit is the megga loud alarm sounder.

Sam the canopy maker came again today to start the final fit.  This has enabled me to finally get the big tempory cover off.  Whist it has done a stirling job the constant noise of it russtling in the wind has really irritted me. So..........


Before

And the big reveal...........


After

 Panoramic shot front

 Panoramic shot front

Sams Website  
I have a comment from an email corrispondent about the pram hood:-"The dogs Bollocks"  guess he didnt want to put it in the comments box. I aggree.  I will show it off on another blog later on as to what it does.

While Sam and indeed his daughter Sam were fitting  this I was bust up the front end.  I have removed the horible steel front doors and replaced them with the loverly oak ones I had made.


Before


After
The grind marks are to remove the hinge

Finally today another delivery of furnature to finish off the kitchen and for the bedroom.  Once again it feels like things are moving again.
Its strange how it goes, you seem to be working and nothing seems to get done, then in a couple of days all the prep comes together in a big way.

Sam is back on Friday to put the final fittings on the cover.

Read More..

Rabu, 23 November 2016

Stacking the Deck

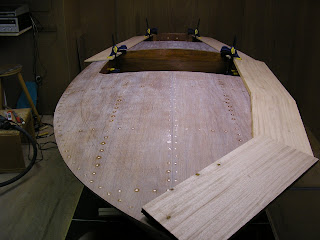
The first step in the deck planking process was laying out the lines on the subdeck plywood so I could figure out what wood I needed to do the job. I drew in a 2" grid pattern on the sub-deck to ensure that the center planking would be symetrical. Using a batten, I drew in the perimeter cover board lines to follow the carlings aft of the dash and stay a "constant distance off the shear line" forward of the dash. I made the first line drawn on the forward deck (that I liked) the "master" and copied it to the other side. There is a slight difference in distance to the shear line from one side to the other, but not enough to worry about.


Then a trip to Armstong millworks to buy some African Mohoghany for the deck planking and then learn how to re-saw. The guys at Armstrong suggested that starting with 4/4 stock planed to as thick as possible (about .90") would be the best approach.


I started with laying out the boards along one side of the boat to determine joint locations to get a 12 long 10" wide board to cover the width and length. Due to the limitations of my shop, the board was cut into the pieces and angles necessary to go around the boat on one side, then each piece re-sawn to create the piece for the opposite side. With a riser kit previously installed on my bandsaw, a new 1/2" wide skip tooth blade, new Olsen "cool blocks" and a 6" tall fence, I started bandsawing the wood for the outer perimeter planking. The piece at the back of the boat was 9 3/4" wide and the re-saw went very, very, slowly, but it worked. Then a few trips through the thickness planer (new blades installed) yielded planks about .34" thick. Using countersunk screws, the first piece was located, beginning at the aft end of the boat and working forward, a joint line established, chop cut on the mitre saw, reinstalled and the next piece cut to fit up against the previous piece.
After the joints were established, the inside line location was transferred from the sub-deck to the underside of the cover boards. In the cockpit and motor opening area, tracing on the underside was straightforward. In other areas the grid pattern was used to re-create the line by tracing the inside edge of the boards onto the grid pattern and measuring to the line intersection at each grid line. Tedious, but it worked. Line was cut on the bandsaw about 1/32" proud and then sanded to the line with a small 1" stationary belt sander. Outer lines were traced, cut, and sanded in a similar manner.

The kingplank down the middle of the boat took a bit of trial and error to find a width that looked "right". I started at 6 1/2" wide, about an inch wider than the perimeter boards in the fore deck area and it seemed too dominant. At 5 1/2" it still seemed too wide, so eventually my aesthetic director concurred with a 4" wide being the "right" width.

The grid pattern helped with cyphering out the width of the longitudinal planks. Eventually settling on 1 7/8" width, and a 3/16" gap. In order to fully utilize the boards I had purchased and not have to go buy more wood, I needed to squeeze four planks from a board width of just under 7 3/4" inch. (Maybe the king plank should have been a bit wider!) This created an opportunity to buy a new tool for the shop - a micro-kerf table saw blade which only cuts a 1/16" wide kerf. After creating a new table saw zero-clearance insert with a splitter, I was all set to cut the planks. The new blade cut like butter and I got all the pieces needed to cover the deck.


The plan at the moment is to stain the perimeter and king planks a darker color to provide greater contrast. Then finish all the planks to seal all the grain and complete the deck using a white pigmented epoxy to fill the gaps.


Read More..

Lounge Furniture Ordered

After much deliberation the sofas have been ordered.  In the end war was averted.

 We have 2 of these on the way

Also ordered today is the TV unit.


I have been working on the water tank, my brother the stone mason came Monday to do the template for the kitchen worktops.  We are having Star Galaxy.

Easy to see how it gets its name

I have started building the bedroom furniture now, all the kitchen appliances are on order, the bow thruster is in but I am waiting for the cables to be made before I blog it.

So things are moving in many directions and I can definitely see the light at the end of the tunnel.  So much so I am now searching for moorings.


Read More..

Selasa, 22 November 2016

Let the dreaming begin!

This guy just came in the mail.


1,000 routes from the South Seas to the Arctic!
Read More..

Love Him or Not Book Review


Book CoverCapt. Larry Simns has probably had some effect on your life if you are in any part of the seafood industry, if you like to fish, if you are concerned with water quality, if you love to eat seafood, if you live or work near the Chesapeake Bay and its watershed, are a politician in the Maryland State House, or for a variety of other reasons. If you dont know his name, or the only thing that you do know about him is his name, then you should read this book.

In the newly released The Best of Times on The Chesapeake Bay, An Account of a Rock Hall Waterman, Capt. Larry Simns (the n is silent), and co-author Robert L. Rich, Jr. tell the story of how he grew up in the small harbor town of Rock Hall on Marylands Eastern Shore. He began his education in seafood harvesting at six years old, he went through brutal but valuable apprenticeship with seasoned and unforgiving Captains in his teens and he grew to become a respected Captain and seafood business owner in young adulthood. He recounts how he reluctantly found his voice as he began his rise within local groups of watermen to become a legendary advocate for them and the Chesapeake Bay in response to critical declines in seafood populations in the early 1970s. In his 40 years as President of the Maryland Watermens Association, he was not only recognized for his work by professionals with interests in the fisheries from Maine to Alaska and the Gulf Coast, he also worked with Senators, Governors and U.S. Presidents.

If you spend any time with a waterman,it would be difficult not to notice that theirs are very tough jobs. Many of our neighbors start their day at 3:00am. They work when its 20 degrees outside. They work when its 100 degrees outside. The brutal apprenticeship that Capt. Larry went through was important for learning to live in an environment that might be idyllic one moment and potentially deadly the next. There are some very exciting moments in the book. In fact, Capt. Larry went through more than one situation where he almost didnt survive.
 
He clearly explains how various finfish, oysters and crabs were harvested, having experience with pretty much every method used. He explains how "The Bay" changed after Hurricane Agnes. A resulting drop in seafood harvests coincided. Other factors including pollution from other sources led him to the chain of events that made him the powerful advocate he is. He discusses how he worked with others from various disciplines including biologists, environmentalists, and others to create policies that were not always popular. An amazing journey for a waterman from Rock Hall, Maryland.
 
Theres a whole lot more here and I highly recommend this book. Most of the chapters are brief, but full of information. It provides an education about the Chesapeake Bay, Eastern Shore life, the history of its watermen, issues surrounding its protection and much more. One gets the sense that, knowing he wont be around forever, he would like for this book to help pass critical information to those for whom stewardship of the Chesapeake and the life within it will pass. We should pay attention.
 
For more information go to: 
http://www.thebestoftimesonthechesapeakebay.com/

Book Details

The Best of Times on The Chesapeake Bay, An Account of a Rock Hall Waterman
Lived by Captain Lawrence William Simns
Written by Robert L. Rich, Jr.
Illustrated by Ann Crane Harlan.

ISBN: 9780764342776Soft Cover
288 Pages
42 illustrations


Read More..

New Batteries

The new batteries arrived today.  What with holiday season and the need to have these made to order has meant a 6 week wait.


The new set have some additional features.  The principle requirement was to have a system that would evacuate the hydrogen that builds up when the batteries are charging. I certainly dont want another episode like before.

The system sold to me also has the added benefit of auto topping up.

So this how the new setup looks.


The vertical tube on the left is the venting tube. This connected nicely to the existing vent.


The vertical tube on the right links by a snap connector with a one way valve to a pressurised bottle.


This is filled with de-ionised water and is pressurised by the built in hand pump.  There is a small paddle wheel that goes round to show when water is going in.  When this stops the system is topped up.  The cells cant be overfilled as each cap has a float valve.

No lid will be require as the terminals are all insulated.  I still have the put the proper output cables on but these need to have terminals crimped on and will be done tomorrow.

The good news is the charging side of the inverter didnt suffer any damage and is working fine.
Read More..

Joining Plywood Jigsaw or Puzzle Joints

I apologise for my long gap between posts, life has been very full for awhile.

Jigsaw joints have become a popular method for joining 8ft plywood lengths into the long panels needed for building most boats. It is an easy process for those who are building from a kit but it is impractical for most people building from scratch. If building from plans or from patterns then you will have to make every cut by hand using a jigsaw and the accuracy necessary for a close-fitting jigsaw joint is just not possible to achieve.

For those who have not seen a jigsaw joint, the form is exactly the same as the interlocking curves of a jigsaw puzzle, except that the interlocking curves are laid out in a straight line rather than in a grid pattern. This forms a very accurate and secure junction between the two parts, unable to slide apart and needing no clamps, while the glue sets.

Jigsaw joint configuration.
The two parts have glue applied to the bonding surfaces, then they are laid on waxed paper or plastic to prevent adhesion to the surface below, aligned properly then a rubber mallet is used to force the fingers of the upper part down into those of the lower part. Care must, of course, be taken to ensure that the surfaces of the assembled joint are perfectly flush or there will be a permanent deflection at that point. The photos below, courtesy of Chesapeake Light Craft, show the joint before and after joining.

Applying glue to the bonding surfaces

Cleaning up the completed jigsaw joint
Tight joints as described above assume that you will assemble them on a large table or a workshop floor before moving the panel to the boat. This is OK for dinghies or for professional builders who have enough space and the staff to manhandle large panels from the shop to the boat and to position and clamp them accurately, all after applying glue to the framing of the hull and to the panel, trying to get it into exactly the right position first go so that it doesnt slide on that slippery glue and spread it everywhere except in the joint where it is needed, then clamp it accurately so that it can finally be fastened. You get the picture, of enormous potential for disaster.

For amateurs building bigger boats it is just not practical to assemble the panels before installation. Panels 8ft long are very convenient for one person to handle, without having to call on the wife, kids and neighbours to help with the task. I built the structures and interior of my Didi 38 "Black Cat" entirely single-handed. There was not a single piece of timber in that boat that I was not able to carry and set up without any assistance. But I made scarph joints by hand and I glued them in position.

Building with jigsaw joints and gluing the joints in position requires a slightly different approach. It is not practical to hammer a tight joint into place with a rubber mallet. The stringers and other supporting timbers are springy and will bounce away when hit, making it difficult to get the fingers properly flush. Another factor is that of longitudinal alignment accuracy. If the first piece is slightly out of longitudinal alignment on the framing then the accuracy of the jigsaw joint will force the other pieces to continue that misalignment. An error of 1mm on the first of 4 panels will grow to an error of 4mm by the end of the 4th piece.

The way to get around this is to machine in some tolerance into the joint. When the jigsaw joint curves are added to the CAD drawing of the panel, the curves are used to break the panels into the pieces that will fit onto 8ft sheets of plywood. Then the jigsaw curves must be offset into each panel by 50% of the tolerance that is decided upon. This means that each piece is minutely shorter than the designed length and the fingers of the joints are minutely slimmer. The result is a joint that can be easily pushed into place without hammering and which also has a small amount of wiggle room to allow for correction of minor installation misalignments.

This more loose joint may need a temporary doubler on the back between stringers so that small screws can be used to pull the fingers flush if the panel is curved at that point. Dont forget to use a waxed paper or plastic bond-breaker to prevent adhesion of the doubler to the panel.

After the glue has set you can use a belt sander to clean up the surface for a nice finish and a joint that will disappear in the painted boat.

For info on our boat designs, please visit http://dixdesign.com/ and http://dudleydix.blogspot.com/.
Read More..

Minggu, 20 November 2016

The Lightship Chesapeake

Its always nice when someone posts photos of your work on the web, especially when they have expertise about the boat in question. This is a model of a lightship that we did back in the mid - 90s. The research involved taught me a lot about  the history and work of lightships in the United States over the last few centuries. These ships were used, not only in coastal waters, but within the Great Lakes. Almost every lightship station had a succession of different vessels as technologies improved. Lightships were different from each other and varied in size. Prior to being the "Chesapeake", this lightship was the "Fenwick". If I recall correctly, it came off of the ways in Charleston, S.C. in 1928. Its sister ship, LV117, on station as the "Nantucket", sunk when the "Olympic", sister ship to the "Titanic" hit her on a foggy day in 1934, killing several crew. It was dangerous and, as I understand it, very boring work. All of the lightships have been replaced now by "Super Buoys". http://www.lightshipmodeler.iwarp.com/custom3.html
Read More..

Sabtu, 19 November 2016

Floor Laying

Earlier in the week I did some finishing work on the sliding hatch.  More on that later.

Over the last few days I have started fitting the flooring.  We have chosen laminate flooring as it is very durable, attractive, stable, and easy to replace in time.  Modern Laminate is IMO better than real wood in appearance.  The one we have chosen for the lounge is a thicker than normal.  Its 12mm not the normal 6-8mm and a good textured surface with enough grip for our aged dog.  I have used a 5mm HD foam underlay for a bit of extra insulation, it also has a foil layer supposedly to reflect heat back up.

Before

After

This is a far as I go for the time being.  The rest will be laid once the boat is afloat.  I need access under the floor to add ballast to trim the boat.

Of course in the kitchen nothing other than Sicilian Slate could be used.  OK, its expensive but boy does it look good especially now its oiled.

Before

After

Other jobs done are some work in the bedroom on the ceiling and making the steps to the bow doors, and dressing the stern entrace to the boat.


You will notice all the wires. Im redoing this as I wernt happy with the appearence.

In fact I have a lot of small jobs on the go, but noting complete enough to be blog worthy ATM.

Read More..

Jumat, 18 November 2016

Lappy Working

My laptop is now up and running again so I can upload some pictures.  The  iPad is good but theres no easy way of directly getting camera pictures on to it to blog.

I have been working on the kitchen fitting and made some temporary stairs.  Fitting the kitchen has been pretty straight forward accept for turning the corners of course.

Port side

Starboard side

Theres also another 2 units to go along from the side panel which forms the side for the integrated washing machine.  The cooker will be opposite the stairs and then another curved end unit to form the walk through.

All the domestic water service is now installed accept for the final connections to the taps and appliances.  The 25-40psi pump I have installed under a kitchen unit. 

Yes I can easily get it out again! 

 Kitchen sink unit

I am really pleased with the stairs I made using the calculator a while back see here they have worked out perfectly in fact.

Temporary steps. The final ones will use the same stringer
Read More..