Potpourri - ...a stew with a wide variety of ingredients ... or ...any collection of miscellaneous or diverse items...
Well, it has been three weeks since I wrote anything here, and Ive been feeling mightily guilty about the delay. It has been caused by a range of things over which Ive had little control, but the result has been that Ive been so busy that somethings have had to slip. My website and this blog take a lot of time to maintain, and as I need to feed my family, a job at the local hardware store has had to take priority. The hardware store job will finish next Sunday afternoon, so I hope to get back to posting reasonably regularly.
_______________________________________________________
Sliding Seat Rowing Boat?
.JPG) |
| The sliding seat rowing boat on our verandah |
Ive recently finished building a sliding seat rowing boat for a friend in Brisbane. You can read some earlier comments in this post.
The kit-boat has turned out nicely, although I have some doubts about the use of jigsaw puzzle joints to make full-length planks from eight foot long sections of plywood. It is the standard old problem faced by kit manufacturers - how do you pack a long boat into a flat-pack which is only eight feet long? Most use the so called jigsaw puzzle joint, but the problem with long planks is that there is too much possibility of misalignment due to the tolerances in the joint. This is particularly serious when the planks are narrow as is the case with a lapstrake hull.
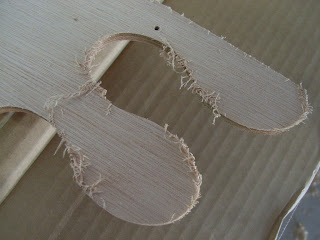
In the photo above you can see one of the plank sections in the foreground prior to being cut free from the routed sheet of ply.
Next photo shows a close-up of one of the planks after being cut from the sheet.
The fuzz left by the router was lightly sanded.
And here you can see that the kit manufacturer did a nice job of producing the puzzle joints.
The photo above shows one of the planks being clamped up on my very sturdy and flat scarphing bench. In the background you can see another set of clamps over a second joint. As the boat is around 19 feet long, each plank requires two joints to make up the full length. Not visible in this picture is the matching plank for the other side of the boat which is being clamped-up on the other side of the bench.

Here you can see that when some of the plank pairs were stacked on each other to check that they were identical, significant variations were discovered. This pair was the worst result I got, but when you consider that the angular difference at the joint was only 0.75 of one degree to produce this error, you can see how tricky it is when the planks are so narrow. I was aware of the potential problem and took extreme care with pencil lines drawn on the bench top taken from stacked sets of dry assembled planks. Most of mine worked out reasonably well, but the set shown in the above picture was so bad that I had to pull the joint apart using heat to soften the epoxy. The planks were then re-glued to an acceptable standard
 |
| In the right foreground you can see the puzzle joints in the assembled hull |
The patented Lap-stitch method used in this kit is a form of stitch-and-glue construction, and as with most stitch-and-glue designs, the hull does not require a strong-back nor a mold. However, any error in the shape of the hull components when laid out flat will result in a distorted hull after assembly because there is no mold to keep things aligned. If the plank shapes are wrong - even slightly - the hull will be out of shape. I do not mean to imply that the kit, nor the design, are in anyway sub-standard - I think it is an excellent boat. What I am saying is that if you are going to build a boat using jigsaw puzzle joints and a moldless construction, then you had better be extremely careful to ensure that there is no distortion induced by the use of puzzle joints - particularly in long, narrow boats with many (therefore very narrow) planks.
Here are a few more pictures of the finished boat, looking very nice to my eyes.
__________________________________________________________
Jim Michalak Scram Pram
A customer (and? friend) has delivered his partially-completed Jim Michalak Scram Pram to me to have the boat finished. Unfortunately, work pressure has prevented the owner from completing the work.
 |
| A Scram Pram photo taken from Jims catalogue on Duckworks |
Im excited about getting this job for two reasons;
- I hold Jim Michalaks work in very high regard; and
- Scram Pram incorporates the Birdwatcher cabin arrangement, which was devised by Phil Bolger and put to excellent use by Jim in a number of his designs.
For decades I have been fascinated by the functional possibilities of the
Birdwatcher cabin. The idea is that all crew members sit inside the boat with their heads covered by the raised-deck of the cabin and looking out through panoramic plastic windows. There is a slot down the centre of the cabin - usually about two feet wide - which allows people to walk up and down the boat while standing upright, yet well protected from falling overboard.
 |
| This photo shows part of the interior of a Birdwatcher. I have taken it from the web, but Im pretty sure that it belongs to Mason Smith. |
The best way to describe the
Birdwatcher concept is to read what Phil Bolger himself said about the idea. This essay is taken from the now-defunct magazine,
Small Boat Journal.Dear SBJ
The first time I ever heard of Phil Bolger was when I received the literature on Dovekie (see SBJ#39) from Edey & Duff. Dovekie encompasses everything I want in a boat but is only available in a sailaway version. I would rather build my own or something very similar. I’ve built three previous boats and enjoyed the experiences immensely. Does Phil Bolger have plans available for a homebuilt version of Dovekie?
— L.D. Blotter Ogden, Utah
PHILIP BOLGER REPLIES
Dear Mr. Blotter,
Several others besides you have asked for a home-built Dovekie, but even the prototype Dovekie was impractical for one-off building, and after several years’ development by Peter Duff, it’s out of the question.
What I take you to mean, though, is not necessarily a copy of Dovekie, but a new design with the same objectives: a very light and shallow boat combining cabin and cockpit into one large space, with oar instead of motor auxiliary, and capable of being sailed in an unstrenuous fashion. One should be able to enjoy this boat in intricate and inaccessible places afloat, as well as trailer it far and fast on the highway. It is what 1984 Sea Trials judge Jack Dunn (see SBJ #39) called a “birdwatcher” a craft “in which one might poke through a marsh or backwater in search of nothing more than a pleasant lunch and a tan.”
For home building, the sharp-sterned “instant boat” shape has a good record. The sides are prefabricated simply by sawing three 4-foot-by-8-foot sheets of plywood down the center and butting them. Wrapped around four bulkheads with flared sides, these straight-edge panels produce the sheer, rocker, and raked ends shown: a hull not at all crude or ungraceful to my eye, and one that can sail and row most respectably.
Hulls like this go best trimmed down by the stern. They’re not happy if the harsh forefoot gets in the water, but they can stand a lot of weight if it’s kept aft since a pointed stern doesn’t drag much at any depth. Sail-carrying power is less than in a boat with a wide stern, but the loss isn’t prohibitive.
Galley Rower
A major advantage of this hull shape is that the oars can be trailed straight aft without shipping them, an advantage when passing through a narrow place or past an obstacle. This has been a problem for craft with closed oar ports ever since war galleys tried to scrape each others oars off. The closed ports are necessary in any high-sided boat meant to be rowed seriously, for an oar working at a steep angle to the water makes heavy work and little power.
The far aft placement also puts the oars where the sides are close enough together to use oars only 7 feet long. These have less drive than 9½-foot oars, but they’re easier to ship and unship and stow in the boat. They also can be worked in tighter quarters, such as narrow creeks and marina slips, and they’re much cheaper to buy and more easily replaced at short notice. She’s not meant to be rowed far or fast in any case. The 7-foot oars should move her 2½ mph in a glassy calm. With a short, quick stroke, it will be possible to move her a short distance against a fair breeze, or across a strong breeze with calculated use of the centerboard.
I know very well that these oars, or even the longer oars of Dovekie, can’t do everything a motor can. Ingenuity and patience are supposed to substitute for power. Plan routes to go with swift streams, not against them. Till the tide turns or the wind shifts, sit and look at birds or read Francis Herreshoff on yacht design (he said it all). However, if nothing but a motor will suffice, I’d suggest the yawl-boat way — in this case a small inflatable with motor fitting to push or pull the mother ship. Birdwatcher can tow it quite easily under sail, though not under oars. An inflatable would also be useful for shoreside excursions because Birdwatcher isn’t light enough to drag or carry over flats at low tide or small enough to be welcome in a crowded dinghypark. Her shallow draft doesn’t make her an adequate substitute for a tender.
No boat meant to row can afford the tremendous drag of an immersed rudder or centerboard. A swinging-blade outboard rudder takes care of half the problem. The proposed hull shape isn’t well suited to leeboards, so the centerboard is designed to come up flush with the bottom. There’s some drag from the edges of the slot, but I don’t think it will be very noticeable. Under sail, the centerboard’s broad, delta shape is designed to be effective with less-than-optimum attention to the tiller.
Glassed-In
Now for the radical part of the concept. Live ballast, crew weight, is important to the sailing of any very light boat. Yet in this case, we want to avoid strenuous positions as much as possible. For our purposes, the best place for the crew is on the bottom of the boat. Hiking or trapeze riding is exhausting for birdwatcher-type crews, and it loses effectiveness if the boat heels sharply. Helmsmen and crew both have to concentrate fiercely to keep the boat sailing as upright as possible. But with the crew sitting on the bottom, the weight gains effectiveness with increasing heel. Crew can chock themselves comfortably in place and let the boat heel as much as she likes instead of scrambling to hold her down.
The catch is that even on the bottom the weight is not very effective unless it’s well over to the weather side. And if the boat is open on the weather side to allow this, it’s normally open on the lee side as well and will ship water if she heels a lot. Raising the sides high enough to come clear above the heads of crew sitting on the bottom, with enough deck overhead to allow the boat to float dry flat on her side or beyond, would make the boat uncapsizable, except in a breaking sea. The upper sides would be transparent plastic for an all-around view, with enough transparent panels in the top to watch the sail. The open center keeps most of the advantages of an open boat —mainly being able to move around without clinging precariously on top of the boat. As the cartoon section shows, an adult is waist deep for almost the full length of the boat.
To keep this “standing room” clear, I’ve located both mast and centerboard off center. The off-centerboard case is still far enough inboard to have its top open with no risk of flooding her through it. The space outboard of it forms a big bin for general stowage, even real mattresses. Since I want the weight kept aft in this hull shape, I don’t mind blocking off the bottom there. Underway, the crew would sit just abaft it, where they should be for best trim.
The tiller is hooked up to be comfortable for a helmsman sitting under the deck but pivoted so he can stand up with it still in hand. The connections are a little busy but can be made strong and positive. If I do working plans for this boat, I intend to add a triangular cap on the outside of the sternpost to reduce the rake of the rudder axis and tiller stock.
It’s possible that sometimes, in some places, this raised deck arrangement will be intolerably hot. I hope there will be an eddying air circulation through the centerline opening, but that remains to be seen. Opening panels in the sides would be complicated to build and degrade security. (The oar ports are bad enough, but even if one of them were caught open at the wrong time, they’re not big enough to flood her suddenly.) Using plastic with ultraviolet filtering, either the usual “black glass” or the outside mirror material sometimes seen in vans, should help by giving some shade and ought to reduce sunburn and eyestrain. Unless the wind is very strong, one could stand up now and then for a breath of fresh air. At any rate, if the ventilation turns out to be bad on a hot day, the shelter will be good on a cold one.
The long standing room can be covered by a tightly-stretched hood unrolled from end to end, with a stiffened section over the slope at the stern that could be swung up to get in or out with a minimum of drip. With this cover in place, she’d be highly streamlined for very low drag at highway speeds or for riding out a gale at anchor or on the beach. It would also be easy to design a full-headroom tent (see “Shallow Draft Boat Tents,” SBJ #44) or awning and put the hibachi on deck.
Docile Rig
The rig, disregarding the ballooner shown, is the most docile and foolproof there is. There’s no halyard, allowing the mast to be slender at the top and eliminating expensive track or messy lacing. The sail is rolled from the clew toward the mast, keeping the leech tight inside the roll. Despite a little trick of angle and tension to avoid leaving a loose flap at the top, this arrangement reduces the temptation of leaving the mast standing under oars or at anchor. Except when actually sailing, mast and sail are supposed to lie in the racks on deck, as shown, except that I drew it with the wrong end to — the heel ought to be forward. To sail, drop the heel into the step and walk it upright —no feat, given the secure footing and waist-high coamings.
The sail could be reefed by shifting the head lashing before putting the mast up, but I don’t think reefing will be necessary. The size of the sail is modest. By swaying on the snotter, the sprit boom will flatten this sail out all the way up, so the sheet can be eased without letting the head of the sail flog. The pull of the snotter will bow the mast forward to take draft out of the sail. With such effective feathering, in a hull that can heel any amount without problems, she can “lug what she can’t. carry.”
Off the wind, the sprit-boomed sail swings out without twisting forward at the top, so she won’t roll much, let alone threaten goose-winging. Since such a sail is very light to sheet in all points, the single-part sheet shown is perfectly adequate, saving tangles as well as expense. And the self-righting boat allows it to be cleated without qualms.
I doubt the balloon jib is worth the cost or space. Set from the offset mast, it would work noticeably better on port tack. It would set best tacked on a pole, spinnaker-fashion, but that involves the extra spar and two guys to control it. I’d rather relax and look at the scenery.
— Philip C. Bolger
 |
| Here is Phil Bolgers original sketch of the Birdwatcher concept. Note the centreline hatch or walkway in the cabin top, and also the transparent sections of cabin roof aft through which the skipper can view the sails |
 |
| This an enlargement of a section of the above image to clarify the arrangement. |
There are a number of significant elements in the Birdwatcher cabin arrangement, but the most important is: -
- that if the boat is capsised, the walkway remains above the capsised waterline and due to the buoyancy of the raised-deck cabin and the weight of the heavy bottom panel, the boat is self-righting; and
- the occupants of the boat are protected from sunburn and/or cold water waves and spray.
The boat Ive been asked to finish is Jim Michalaks
Scram Pram design, which is 16ft x 6ft 6in. Here are a few photos taken by the owner before transporting the boat to my workshop.
 |
| The bottom of the stitch-and-glue multi-chine hull. The boat may look a little boxy, but this is a slippery shape |
 |
| A good view of the Birdwatcher - style cabin. Note the very handy stowage for anchor rode etc behind the bow transom, which is cut away to allow easy access to and from the boat on a beach. |
 |
| A good view of the boat. The cabin windows will be tinted plastic. |
______________________________________________________________
Swampscott Dory
For many decades the dory has held a fascination for me. The term dory is used incorrectly by many people to describe a wide range of boats. In reality, dory refers to a method of construction rather than a particular type of boat, but the construction method does tend to produce a distinctive styl of vessel.
The construction method incorporates the following elements (or their developments using modern construction materials): -
a flat bottom panel which is relatively narrow, and planked longitudinally (instead of the cross-planking used on flat-bottomed skiffs and sharpies);
topside hull planking laps over the edge of the bottom panel (rather than the bottom panel lapping over the chine and lower edge of the topside planking as is the case with the sharpie);
substantial flare in the topside planking, which naturally produces a strong sheer.
It is said that the so-called Swampscott Dory type (named for one of the towns which had a strong dory building activity) represents the best type of dory for sailing. Dories were normally considered to be a rowing type, unsuited to sail, but the Swampscott and similar varieties had knuckle-sided multi-chine hulls which allowed the boat to carry a reasonable amount of sail.
Ive drawn an initial proposal for a sailing Swampscott Dory which is high on my list of designs for my own "Final Boat" ( Ive mentioned another candidate in a previous post). This dory incorporates a few of my own ideas, and may or may not be an improvement of the type - time will tell....
The two significant new elements of this design are: -
Im excited about the second point because I feel that it capitalises on the strong points of both construction techniques and mitigates their weak points. In addition, I expect that this boat can be built without a strongback or mold, and yet it still uses true glued-lapstrake with properly bevelled plank laps. Ill write in more detail at a later date. Here are two early images.
 |
| Lines drawing showing the unusual amount of bottom rocker |


 Loads of great information on the UK International Moth Association site.


 The happy band of sailing men seen in the picture here are volunteers from the "Cale 2 lIle" association based in the French port of Nantes. The association aims to save some of Frances nautical heritage by restoring and maintaining old boats.
 The boat theyre sitting on is one they all helped build - the St Michel II - a replica of Jules Vernes second yacht in which he enjoyed escaping from land to cruise and write his novels in peace. (The reason theyre all sitting on the rail, by the way, is that theyre helping the boats designer, Francois Vivier, to measure the boats stability.)
  The 6 year project to build St Michel II was completed earlier this year and she was launched at Nantes where Jules Verne was born in 1828.
  In 1875 after having been elected to membership of Frances premier yacht club, Verne ordered a larger 13m yacht from the Cherbourg yard of Abel Lemarchand. Although he took pleasure in working with the builder on the yachts plans, she retained the lines and character of a traditional northern French pilot vessel. The new boat was named St Michel II and launched in 1876. Once again Verne undertook a full programme of extended cruising, along the coasts of northern france, the south of England, Brittany, and even across the Bay of Biscay to Bordeaux and back. He loved the peace and solitude he found on board his boats, and was able to write very productively while at sea, unburdened by everyday social and family matters.
 After only a couple of seasons, however, the St Michel II was replaced by a magnificent steam motor-sailer of 31 metres length, the St Michel III, a vessel befitting the worlds most famous author of tales of travel and adventure. This new boat required a crew of 10 men, and Vernes cruises became even longer and more extended, reaching as far as the Baltic, Scotland, Spain, Portugal, North Africa, Malta and Italy.
 St Michel II

+-+Copy.JPG)


.JPG)


