Kamis, 30 Juni 2016


The following Press Release was Sent Yesterday

For Immediate Release Clinton B. Chase, Jr.
Tuesday, March 2, 2010 Sole Proprietor, Clint Chase Boatbuilder

Clint Chase Boatbuilder US Agent for François Vivier Architecte Naval; Brings CNC Boat Kits to New Boat Builders


Portland, Maine –Clint Chase is pleased to announce that Clint Chase Boatbuilder will now be a US agent for precision cut boat kits for François Vivier, a prolific designer of ships, yachts, and traditional small craft in France. Additionally, Clint Chase is contracting with other designers around the world to bring new boats and CNC (Computer Numerically Cut) boat kits to our market for the first time. Vivier’s design work is iconic in France and other EU countries and is bound to become equally iconic to the wooden boatbuilding and boat kit industry in North America.

We are also providing CNC kits to designs by Michael Storer, from Adelaide, Australia, Eric Risch, from Gardner, Maine, and we are in talks with designers in the UK, Finland, and New Zealand. CNC cutters in Maine will be employed to cut the kits and ship them by freight. Cutters in North Carolina and soon Texas will also be employed in the greater effort to get kits into the hands of builders around the country.

Clint has been cutting kits for several months, but is impressed by the interest in CNC boat kits by potential customers, the wooden boat community, and designers whom he has contacted. About a recent kit delivery, a customer in Houston, Texas said, “[the Goat Island Skiff] is a very nice kit overall. I looked at the wood grain pattern of the tank tops and transom, a very nice selection! The crate shows that you care about the things you build. Everything was well packed and labeled.”

"I applaud Clints approach to bring international boat designers kits to the North American market. There are so many creative ideas for small boats around the globe and Clint is approaching this in just the right way. We all wish him well. At the WoodenBoat Show [www.thewoodenboatshow.com] this year (June 25-27, at Mystic Seaport, CT), we are taking a new approach to Family BoatBuilding [www.familyboatbuilding.com]. For the first time, we will be inviting independent kit-producing companies to exhibit and to teach families and groups how to build their own boats. Clint was one of the first to contact us, and we are delighted that he will be building the Echo Bay Dory Skiff with a number of families. Clint is the consummate teacher, and we are excited to have him helping us."
---Carl Cramer, publisher of Wooden Boat Magazine and Professional Boatbuilder

Clint Chase is a graduate of The Landing School of Boatbuilding and Design in Kennebunkport, Maine. He started Clint Chase Boatbuilder after four years running youth boatbuilding programs. The three pillars of the business are: ultra-light, wooden masts and spars (“Birdsmouth” spars for sailboats), custom wood and composite oars, and precision-cut, CNC Boat Kits. In the US, there is a growing popularity and demand for CNC plywood kits for exceptional motor, sail, and rowboat designs from 8-28 feet. However, there are only a few kit providers in the market from which customers can choose and none that are reaching out to designers abroad to bring their beautiful boats to the US market. For more information please visit http://www.clintchaseboatbuilder.com or see our exhibit (building #2, display 19) at the 2010 Maine Boatbuilders Show (March 19-21st at The Portland Company Complex in Portland, Maine).
Read More..

Water Filter Steps TV

I decided to fit a water filter.  This casing can have a variety of filters including a 5 micron carbon filter.  I will start with 5 micron standard filters.

This required the water supply from the tank to be re-routed but this was pretty straight forward.

The large hole is for access to the air bleed valve


Serving will be by a removable middle step.  As this is fitted on the inside wall of the steps it was time to finish making the steps I started months ago.

The oak step tops should be ready later this week

The stone tops for the bedroom draws are coming on Wednesday all being well so I have fitted the bedroom TV as the HDMI cable runs behind where the top is going.

 View from the bed
Read More..
From: "Don Keeney" <1keyknee@281.com>
Date: Sun, 19 Nov 2006 15:39:26 -0600
Subject: [Star45] Sail Trim

A great place to learn about sail trim and sailing in general.
http://www.sailingusa.info/sail_trim.htm

Don Keeney
Star 45 Class Secretary
--
Outstanding recommendation. Wonderful site. full of photographs and all sorts of instructional materials. Pictures of tells and how to read them:)

Another must place to visit (you can try out your sailing skills):
National Geographics Interactive Sailing:

Master rudder and sail to get your boat going as fast as possible no matter what direction youre sailing in-or which way the winds blowing.

Controls available:

Sail Adjuster: Use the left sliding controller to rotate the sail in relation to shifting wind (shown as arrows). When you cross the path of the wind, your sail will swing to the opposite side.

Rudder Adjuster: Using the right sliding controller, steer to port (left) or starboard (right).


Uncle Dave
Read More..

Aiming for Perfection

A comment submitted by Mike about my previous post has reminded me of a short article I wrote a number of years ago. The article was an attempt to explain that it is impossible to achiece a perfect result, but that it is very important to aim for perfection. Maybe some of you may find the message to be encouraging - here it is again...


The middle-age man stood quietly, brush in one hand and paint container in the other. He was carefully observing the hull of his boat, which stood upside-down on a pair of saw horses, the smoothly sanded timber hull glowing in the late afternoon light. 

The construction of this boat had taken the best part of eighteen months of his spare time, but seemed to have taken up all of his spare thinking time! Throughout the man’s adult life, he had been planning to build a boat, but the pressures of work and family had meant that his fiftieth birthday had passed before he had commenced making sawdust. 

Highs and lows dominated his emotions when the boat was under construction. During the years of planing for the project, the man had formed a vision of perfection – he had gone over every detail in his mind, and being a careful and methodical person, he was sure it would all go together just as he had anticipated. A stack of books and magazines provided witness to his thorough approach, and many of his friends had given advice. 

It had therefore come as a surprise to him when things didn’t work out exactly according to his imagined perfection. Over the months he learned to come to terms with broken screws, incorrectly measured pieces of timber, batches of epoxy which went off too fast (and some which didn’t go off fast enough). He came to discover that no matter how much effort he put into the construction, perfection was not within his grasp. No matter what element of the construction he attempted, he found himself wishing that he could do it all a second time in order to get a perfect result.

The desire for perfection, and his inability to achieve it on the job, almost defeated him. However, a friend had pointed out to him that as long as a person tries to do a perfect job, the average standard of work will always be impressive. With that in mind, the man didn’t become depressed if his jigsaw strayed from the perfectly marked line – he just concentrated on the rest of the cut and made sure that the average of the cut was on the line.  

There were hundreds of processes he came across during the construction – many surprises lurked, just waiting for him to relax his guard. What he discovered was that while it is impossible to attain perfection, a determined effort will yield good results. The satisfaction gained from knowing that his glue joints were sound, and that he could work around mistakes, eventually convinced him that his boat was going to be a good one. The materials were of high quality, and he knew that the boat would last a lifetime. 

Towards the end of the structural work a new and pressing problem arose – when was enough enough? Each time he sanded or scraped a deposit of epoxy, he found another blob which hadn’t been seen before, and stood proud of the smooth surface of the plywood. Every time he put the “final” application of filler into cracks and nail holes, he discovered unseen blemishes after the “final” coat was sanded. It sometimes seemed that he could work for another year just on the sanding and filling… 

In the end, he made the decision to apply the first coat of paint – regardless of imperfections. So here he stood, paint brush at the ready, and the result of a year-and-a-half of work in front of him. Taking a deep breath (through his protective respirator, of course) he commenced painting. What a relief! Once started, he knew that he had crossed a threshold, and once again, having fallen short of perfection had not been the end of the world. 

As the painting progressed, his mood lightened, and he found himself enjoying the process of working the thinned primer/undercoat into the smooth surface of the boat. The paint was absorbed deeply by the wood fibre, and although the painted surface showed up previously unseen imperfections, he knew that the end result was going to be good. This boat had not been slathered in epoxy (the epoxy had been used chiefly as an excellent adhesive, and also used in matrix with glass cloth in areas which needed reinforcement), so the man was able to gain satisfaction from seeing the paint lock itself into the grain of the timber. He had, of course, epoxy-sealed the insides of the buoyancy tanks, and a few other areas which would not be well ventilated when the boat was in storage. These areas were not subject to ultra violet radiation, so he was happy to leave the epoxy un-painted. 

A couple of weeks later saw the same man surveying the end result of all of his labours. The painting was finished – all eight coats counting the priming and undercoating – and he was able to see what his friend had meant about the “average” of the job. Sure, there were imperfections, but the boat gave off a distinct feeling of quality. The lines were highlighted by a subtle combination of colours, and the depth of the high-quality, single-pack paint could be seen. In fact, the man was pleased that he had been unable to attain a perfectly smooth surface, as the boat could now be seen to have been hand-made, and it was obvious that the building material was wood.  

Some of the glue joints could be seen, but there were no gaps to hold water that could otherwise induce rot. The man knew that even though the finish was not perfect, all of what really mattered had been done without compromise – the gluing, the fastening, the marking-out and the painting – all had been done properly, and with the best materials. Structurally, this boat was really good. 

Perfection is unattainable, but if you pay attention to what really matters, you will end up with a boat of high quality. However, boat building should carry a health warning – it is highly addictive.
Read More..

Rabu, 29 Juni 2016

The Launch Timeline

     I have a recurring dream where I finally make it out to the boat shop after weeks of neglect only to find the place blanketed in Texas dust and the keel looking like Swiss cheese due to termite damage. A few of the frames are but piles of sawdust. Rather than feeling horrified, I feel relieved. I walk back to the house and order plans for a smaller boat and start packing my things.
     Lately, Ive felt defeated by the size of this project. Previously, I tried not to set a time frame for this project because I felt like I had no realistic idea of how long this thing would take me-- and I didnt want to stress about it. But now, for my own sanity, I need a timeline to launch. Ramon and I sat down last night and hatched our plan:

2013
January: Stringers, chine, and cheeks installed
February: Frames, stringers, chine faired; chamfer on bow and stern
March: Deck beams installed, footwell framed, hatch framed
April: cabin trunk "cutout"? framed
June: Planking complete, deck laid, hull glassed
July: Install bulwarks, start working on interior
August: Hatches complete, cabin trunk completed and glassed, paint

Beginning of September, 2013: The launch!  
Also-- our last days here!

We plan to live near Port Isabel and finish Lunas interior at the marina while I finish up my masters program. 

Depending on how long funds last, and how long it takes to outfit her, we hope to set sail by the end of 2013. Thats only a little over a year away, making it a pretty ambitious (foolhardy?) goal, but it feels good to have something to work toward.

Also-- today I finished squaring up the frames! The next step will be  installing the chine.
Read More..

Steps toward building a sailing model


Building Displaying Sailing
Model Boats and Ships

So you want to build a sailing model
Find plans for a sailing model, buy or find on-line.

Join a model boat forum for advice.

Buy or borrow books on boat building.

Decide on type of planking and wood to be used to build the model.

Set aside a work space for building.

Review the bill of materials need to build the model and buy the materials.

Order deck and mast fittings.

Order mast (if you are buying the mast) and order sails (or sail material).

Choose the radio system, buy a sail control unit, Order keel bulb or get advice and discuss issues of building your own.

While the hull is under construction build:

Keel fin and ballast bulb

Rudder assembly

Make or assemble spars ( mast and booms)

Build cradle to hold boat under construction and when finished.

Test Radio System and sail control unit

After hull is planked:

Install keel trunk or make provisions for mounting keel.

Install radio and sail control unit, Then remove while construction continues.

Construct deck and hatches

Install/mount deck fittings

Test access to radio and sail control inside the hull.

Provide a exit guide for radio antenna so it can be attached to mast or stays.

Install power switch for turning off batteries

Test mount keel

Paint hull, rudder and keel

Assemble hull, rudder and keel

Set up mast and boom.

Install radio controls.

Check running rigging.

Attach Sails

dry sail model

--

Sail
Display
Storage
Read More..

Swift 18

The Swift 18 was a popular British trailer sailor in the 1980s often positioned by the yachting press as an ideal starter boat.

With very shallow draft launching and recovery, essential features for a trailer sailor were good. Accommodation is basic and headroom restricted but the Swift has all you need for a weekend away.

Today a good example can be had for between £4000 to £5000 which is a cheap way of getting out on the water.
Read More..

Build a Model Sailboat !!

The information used for the " Model Sail Boat Building, Making A Wooden Star45 R/C Sailing Model" includes posts found on the companion blog: The Star 45 R/C Model Sail Boat - Builders Journal


"Model Sail Boat Building, Making A Wooden Star45 R/C Sailing Model" is a start to finish, step by step, building manual. Including directions for covering a wooden star with fiberglass.

With the popularity of radio-controlled models, the number of people interested in owning a model yacht has also grown - in geometric range. As with model aircraft, the choice of sailing models runs the gamut from childs toy to sophisticated craft.

Over the past 30 years I have fielded many questions regarding the choices and considerations which go into selecting a radio-controlled sailboat.

Four questions are asked over and over by prospective skippers: How do the radio-controls work? How much do they cost? What do I look for when I buy mine? And, where can I get plans and instructions for building a sailing model?

The modern R/C model sailing craft is as different from a toy boat as a museum display model is from a childs tinker-toy creation. A model sailing craft operates with the same sophistication of design as any full-sized yacht

The AMYA STAR 45 Class discussion group is a terrific place to exchange ideas and talk about building Star 45 models for racing in AMYA regattas.

Feel free to contact me, Dave Mainwaring mainwaring @ rcn.com
Read More..

12DC Generator

I am sick and tired of my current 230v genset causing all sorts of problems with unstable voltage, poor quality sine wave and noise, (engine not electrical) although I suppose there is plenty of that too. My Victron doesnt like it and I have killed so many switch mode power supplies for mobile phones, iPads, even the power supplies in a Sky box, a DAB radio and a NiMH drill charger which actually caught fire didnt like it.

So why have I or indeed any boaters got a generator?  I think in most cases 99% + its to charge our batteries.  Of course we all have one bolted to the side of our main engine which by and large does an excellent job of charging the start battery for which it was designed for and a pretty fair to poor job of charging supplementary or house batteries via various methods of diverting surplus charge elsewhere.


When I did my alternator conversion the one thing I didnt expect to be as successful as it has proved was the ability to run my oven 2.2kw through the inverter and still be putting in as required depending on the SOC of the batteries up to 60amps of charge.  This set me thinking, why the hell am I making 230v to run my inverter charger to then charge the batteries at a maximum of 120amps when my new alternator on the main engine I have seen putting in over 180amps without conversion losses.  I have read somewhere that the Victron inverter on charge makes 800w of heat as well. Heat I really dont want. This I can well believe as I had to add additional fans to the inverter space under the stern steps in order to keep it cool enough to keep the charge rate up as it shuts down the charge rate according to the running temperature. 


So you might wonder where this is leading.  Well as I see it its simple. Use my current 500cc genset engine to spin a 12v alternator instead of running a 4000cc (4L) to do the same.  Big engines like this suffer from bore glazing running on tickover or low loads.  Google bore glazing its an interesting topic with many views generally eventually agreeing its not a good thing.


My initial research lead me to a 220amp automotive alternator

but this would need spinning at 5000+rpm so gearing would be required.  I had considered running a 3kw 230v alternator at 1500rpm (4 pole) but again this still had the electrical conversion losses but in preparation for this I managed to con my current genset into running at 1500rpm by removing a slow run cutout relay.  At 1500rpm its as quiet as a sewing machine.   But then I will need to have made for me a drive pulley set and this will have additional frictional losses and belt slip reducing the limited power the genset engine has.

So having bought the 220amp automotive unit 


220amp Automotive alternator

I did some more Googling  and found a slow speed 12v alternator from the USA. 


The Ecoair company  make probably exactly what I and every boat owner needs, and a 24v version also.


325amp Slow spin alternator

After exhaustive discussions with one of the directors I have purchased one of the 12v (14v) units with the option of becoming the UK / EU importer distributor.

So having stripped my current genset:-


Vetus genset with cocoon

The 230v armature still to be removed

Armature and coupling removed

Flywheel end of the engine

This seems to be a 6 hole fixing with 200mm PCD so I will need to look up the SAE of this fixing.

This is an ongoing project so I might start a separate blog on this conversion.  In the meantime if you want to follow it make sure to bookmark it of check back regularly 


Read More..

Painting

A very kind break in the weather all be it a few days late enabled me to get some painting done.  The first area tackled was the fore deck.  

The original painting had gone beyond saving so it was a back to metal rubdown. The edges had previously been prepped when the blue spray was done.


Then a coat of primer.


This will do until I put the top grit coat on.

Today it was the turn of some extra blacking (tar based paint).  The side of the boat had become a little scabby with the work done with various painting jobs and the natural weathering that this coating suffers from.

Before

After
Read More..

Selasa, 28 Juni 2016

Elan 400 Review

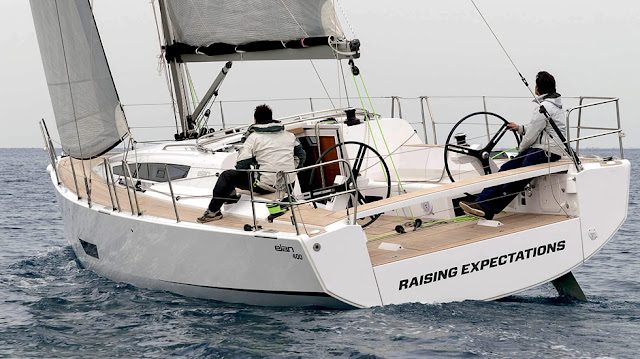
Here is an interesting new yacht from a British designer, Rob Humphreys, and Slovenia based Elan Yachts. The Elan 400 is their latest collaboration and it is indeed a unique boat. It is a racer/cruiser with twin rudders, hard chines and a very distinctive look. Its a look that I find visually quite attractive.
Elan 400: Slovenian Speedster


Lets start by studying the hull. In the plan view, notice that its rather full in the bow at the deck level, fairing into a  moderate beam of 12.69 feet. It carries that beam all the way aft where we find hard chines and a near vertical transom. At 16,500 pounds displacement the Elan 400 has a displacement/length ratio of 141. This is not much lighter than my unabashedly cruisey Beneteau 423, which has a D/L ratio 154. But coupled with a sail area/displacement ratio of 21.1, the Elan will be much quicker in all conditions than my slightly underpowered Beneteau, which has a SA/D of only about 16.0.  With these data points, its clear that the Elan is a pretty sporty ride, but what about those chines and the twin rudders? Do they offer any meaningful advantages or are they there merely for style? Starting with the chines, I would say that they do little, if anything, for performance.  Dont get me wrong, chines have been shown to enhance performance on sailboats. But in my opinion they only make a difference when a boat is in planing mode, which wont be very often for the Elan. I should point out that the Humphreys firm has designed at least one VO70 with chines, and I am certain they make a critical performance difference on such a light and powerful boat. But the 400 is a family style racer/cruiser and I think the chines are there more for style than planing performance. There is nothing wrong with this, they add visual interest and certainly dont take away any performance potential.

Humphreys VO70 at speed. Notice the chine at work, and the weather rudder almost completely out of the water.


What about the twin rudders? Once again, on a VO70 they make a lot of sense. But does that translate to a racer/cruiser like the Elan 400? It would be very interesting to compare a single ruddered 400 with a twin ruddered version. I have no data to support my opinion, but my gut feeling is that in most conditions that average people sail in, the single ruddered boat would perform as well or better than her twin ruddered sister. Here in southern California, we have lots of kelp and I can foresee plenty of fiddling around with a kelp stick and a fair amount of strong language as a racing crew struggles with kelp on our local offshore races. When I think of the added weight, drag and cost of a twin wheel-twin rudder arrangement, I would demand a meaningful improvement in performance from the two rudders and I just dont think its there in typical conditions on a boat of this type. With all that said, Id love to go for a ride on one of these boats.

With its powerful hull,  bow pole, non-overlapping jib and svelte cabin trunk, the Elan 400 is a sporty looking ride.


Moving on to the deck, Im impressed with the innovative features incorporated into it. The transom is wide open, with a seat panel spanning it. This panel is removable and doubles as a gangplank, complete with wheels on the shoreside end,  for when youre Med moored in Monte Carlo. The transom also has a drop-down panel making it into a water-level swim step with boarding ladder and transom shower.

The cockpit is beautifully laid out for racing.


The cockpit itself is very well laid out for a racing crew, with plenty of room to move and ergonomically sensible access to winches, etc. The twin wheels are mounted on fairly lethal looking pedestals and give the helmsman a great view. The general arrangement is typical of the modern racer/cruiser, with short seats forward and wide open space aft. The traveler is mounted on the cockpit sole, which I think is the best place for it and the halyard winches are on the cabin top where they should be. The designers have incorporated a number of tricky features into this area. There is a cleverly designed dining table that retracts into the cockpit sole, retractable footrests for the helmsman, and a recess near the transom for the life raft. Add covered bins for sheets and a retractable companionway hatch board and youve got a pretty busy cockpit. Yet it looks clean and elegant!
Beautifully detailed deck


The rest of the deck is fairly conventional with a low and aesthetically pleasing cabin trunk, jib tracks mounted close inboard and an anchor windlass and locker forward. The boat is equipped with inhauls for the jib, which is an indicator of how serious Elan is about racing performance. Your average cruising sailor wouldnt know what to do with them.

Elan offers the 400 with either two or three cabins. I chose the two cabin version mainly because I prefer to have a dedicated nav station instead of a fold-away chart desk. I think those things look great at boat shows but are not particularly useful. Of course if youre sailing is limited to local waters you have little need for a dedicated chart table and the space would be better used for other purposes.

Sensible layout for casual racing and weekends at the island.


The accommodations plan incorporates a good sized forward cabin with a V-berth, seats and storage lockers. Elan thoughtfully refrained from pushing the berth too far forward so the foot of the bunk is reasonably wide. As in the rest of the boat, there is a plethora of locker doors that conceal lots of fairly small shelves. In spite of all those doors, it looks like usable storage space is somewhat limited. This is because the builder has pushed the lockers well outboard, making them quite shallow, The trade-off is the visual sensation of bright, wide open space below.  I think this is perfectly acceptable given that the Elan 400 is not intended for living aboard or long offshore passagemaking.
In the three cabin version, the chart table folds away to make a full length settee on the port side of the salon.


Given the intended purpose of the boat, the galley is adequate, although you may wish for a bit more storage space here. The aft stateroom is quite large and comfortable looking. The hard chines may contribute to the extra space here, or it could just be that the transom on the 400 is in the neighborhood of eleven feet wide.

The 400 looks fast.


Overall, there is much to like about the Elan 400. The tall rig with non overlapping headsails provides lots of horsepower. The twin rudders should provide precise steering and the deep keel will keep the boat on its feet. As I mentioned before, to my eye this is a pretty boat that has excellent performance potential. While the squared off trapezoid shape deadlights in the hull could have been more artfully designed I expect the Elan 400 to turn heads wherever she goes. I took all the photos shown here from Elans excellent web site and I invite you to visit www.elan-yachts.com to learn more about this interesting boat.


Read More..

Building Phil Bolgers Harbinger

Back in 2002, I received a request from a customer for a pretty Catboat. I cant remember the initial wish-list, but when I showed him Phil Bolgers Harbinger design, he was hooked. Harbinger is a Catboat of the New York model, rather than the better known Cape Cod model, and she has exceptionally fine and easy lines.
?
Fine lines
?
?
Easy bilges
?
Harbinger was designed with rowing as the primary source of auxilliary propulsion, and the New York model was much better suited to this than the more buxom Cape Cod hull-form. Phil had designed the boat to be built plank-on-frame carvel, but as the customer intended to leave the boat out of the water on a trailer, we had to come up with a different method of construction - carvel would open up when dry. The most obvious options were, glued strip-plank, glued lapstrake, and cold molded. I decided to go for strip-diagonal cold-molding, and wrote to Phil to get his permission. He was very happy with my construction plan, but indicated that he was frightened by the labour-intensive nature of the method.
??
The boat turned out to be very successful in construction and use, and Id love to build one for my own use. Very briefly, here are the primary stages in construction: -?????????


?
MDF Molds set-up.
?

7mm WRC strip Planking.


First of two layers of 3mm Hoop Pine diagonal planking.


Lots of staples needed in hollow sections - used a total of 18 thousand, put in individually and pulled out by hand.


Diagonal planking finished. Hull thickness 13mm (just over 1/2").


Shapely and massively strong hull.

?
Launching day.


First sail.


Phil Bolgers Harbinger
When I can get around to it, Ill put up a photo gallery showing the construction in more detail.
Read More..

Senin, 27 Juni 2016

Americas Cup Surprises Abound

1. Oracle looked sloppy when a crewman fell overboard before the first start. No surprise there. Its not uncommon for the defender to be rusty early in the series. Without a competitive qualification series against serious competition, defenders often fail to develop the competitive reflexes and instincts that challengers which have struggled through an elimination series have developed.
2. TNZ showed up with their A game. Oracle did not.
3. The word around the yacht club bars was that TNZ had the faster boat. It sure looked that way in the first three races. But maybe thats not so. Oracle showed flashes of boatspeed, but was foiled by poor boat handling and tactical errors in the first three races. They showed something different in race four.
4. A huge surprise was the series of tactical errors Oracle made in the early going. On the other hand it was beautiful to see how they learned from the early races, adapted and found a way to win in race four.
5. Another surprise was how both crews handled the 72s as if they were dinghies. They both showed that they can create opportunities to pass. This is probably the biggest surprise of the event.
6. Conventional wisdom states that the faster boat will win. Why is that? Well, first of all its incredibly demoralizing to be on a boat that you know doesnt have the straight line performance of the competition. On the other hand, its just as empowering to know that your boat is faster than the competition. It gives you the confidence to sail more aggressively, take more risks for greater rewards.
7. It is also true that, all else being equal, he who makes the fewest mistakes wins. Oracles early errors played a large part in handing three victories to TNZ. By the same token, TNZ had a few less than stellar moments and let race four get away from them.
8. Do not underestimate Kostecki. One thing you can be sure of is that the crew of Oracle learned a lot in the first four races and, more than anyone else, John Kostecki took the measure of TNZ. It was not a fluke that Oracle won race four.
9. With the 24 knot limit on windspeed, these boats will probably survive the entire series. Still, they are experiencing apparent winds of over forty knots on the upwind legs. Im expecting more carnage before this event is over.
10. Contrary to popular opinion, including that of yours truly, this is turning into an exciting event and I am looking forward to tomorrows racing!


Read More..

Some more nice plywood

A little good news, some seriously scary shit, and a very impressive trip...


I miss the French canals.

Listening to Soldat Louis

So it goes...
Read More..

Foot Brace in First Mate


All of the hull panels in First Mate, including the narrow flat bottom panel, are made from 6mm/1/4" marine plywood. Wayne Jorgensen, who helped build the first boat from the design to hit the water, expressed some concern about the stiffness of such a thin bottom panel. I wasnt particularly concerned, as the panel is only 856mm/34" wide at the widest point, and is very well supported by the centreboard case, 6 bulkheads and frames, and most importantly, by a 66mm x 19mm (2-9/16" x 3/4") external keel batten firmly glued to the bottom of the boat. In addition, I sheathed the boat Im building with 200gsm/6oz glass cloth in epoxy.

In a beach-cruiser, light weight is of critical importance for a solo sailor, and I also wanted to economise on plywood, getting the most possible out of standard sheets - it made sense to use a standard thickness for all panels. Having said that, there is nothing to prevent you from using 9mm/3/8" ply for the bottom panel if you wish.

As part of the design, I drew an adjustable set of foot braces to make rowing more efficient, and also to give something against which to lock your heel to prevent sliding across the boat when heeling under sail. These foot braces gave me yet another opportunity to stiffen the bottom panel. Following are a few images of the set Ive just installed in the First Mate which I am (slowly) building: -

An overview showing how the side rails of the braces are glued to the bottom of the boat, and extend forward and aft to teminate against the bulkheads. This is very important, because terminating a stiffner in the middle of a sheet of plywood risks the formation of a crack in the plywood eventually. Note how the side-deck knees in the background are tapered and lead all the way down to terminate on the chine between the bilge panel and the topside panel.

Blocks to locate the foot brace. In this photo the longitudinal rails had been glued into position, but the blocks were just dry-fitted. They were subsequently glued to both the rails and the bottom panel
??????
Three photos showing the foot brace dropped into the three different locations. The longitudinal rails are rounded down at the forward and aft ends to allow drainage of water - sort of like an open limber.


With these longitudinal foot-brace rails in place, along with the external keel batten on the other side, the maximum un-supported width of the plywood and external glass sheathing is about 210mm/8-1/4"
Read More..

High peaked Gaffs

Some of you may have noticed that all of my gaff sail plans have a short hoist (luff) and a long, high-peaked gaff. To many, this is a somewhat strange-looking shape compared with the more commonly seen longer luff, shorter and lower peaked gaff.

Pegasus 18.5

So, why do I do it that way?

The main reason is to keep the mast as short as possible. This may not be such an issue in a boat which sits on a mooring, but for a trailer boat, every inch you can remove from the length of the mast is important. Added length in the gaff means reduced length in the mast - although there are diminishing returns, as the peak halyard needs to intersect the gaff at as close to a right-angle as practical. This is so that the gaff stands well, with minimum sag, when under a weight of wind - in the process reducing twist in the sail. The result is that the mast needs to project quite a distance above the gaff jaws, and a quick glance through your boat books will show that many designers and builders make the mast too short above the jaws, and the halyard then works at a very inefficient angle. This is one of the reasons that gaff rigs have a bad name for windward work.

The second reason for my use of long, high-peaked gaffs is that the light, flexible gaff tends to bow around the halyard attachment point when the wind gusts, automatically flattening the sail at just the right time. Also, by tweaking the peak halyard, you can produce very effective sail shape adjustments when changing point-of-sail, or during varying wind conditions. The high-tech racing boats spend hundreds of thousands doing this with carbon-fibre and stainless steel - here we can do it (in a cruder, but effective way) using home-made wooden spars and a bit of line.

I frequently draw a tiny, short-luffed jib for these rigs. The short luff and small sail area means that the little sails stand well, even though the masts have no shrouds or backstays of any sort. However, the effect of the jib is remarkable, as it smooths the airflow around the section of the sail attached to the bulky , turbulence-inducing mast. The jibs are so small that the rig can be used with, or without the jib, and will still balance well.
Read More..

First Mate Sailing

There are quite a few examples of First Mate on the water now, but except in photographs, I havent had the opportunity to see the boat sailing.

First Mate with the sprit rig option
I designed this boat for my friend, Ian Hamilton, who wanted a Phoenix III but didnt have the confidence to tackle such a building project. However, having previously built a Bolger Cartopper, he felt that a stitch-and-glue version would be within his capability.

As it turned out, Ian never did build the boat, so I came up with a deal where he would pay for materials, sails, trailer etc., and I would build the boat in my own time. This approach saved him a lot of the money normally required, and it allowed me to test the panel developments I had drawn - the most critical element in a stitch-and-glue boat design. A symbiotic process. The problem from Ians point-of-view was that once I had proved the panel developments, there was no pressure on me to finish the job!

The stage at which Ians boat lingered for a long time

Well, Ive gradually got Ians First Mate finished, and weve had three outings to carry out "Builders Trials" - Im absolutely thrilled with the results so far!

The video link below shows First Mate sailing off Manly, which is a bayside suburb on the south-eastern side of Brisbane, the State Capital of Queensland, Australia. Conditions were good, with about 15 knots of wind from the north-east, kicking up a short, steep chop. The rig on this particular boat is the 76 sq.ft. balance lug, but Ian will probably purchase the 104 sq.ft. sprit rig at a later date. Because both rigs use the same mast, in the same location, it is quite feasible to have interchangeable rigs for different styles of operation.

I was the one with the camera, and Im afraid that there was nothing I could do about the camera shake in the choppy conditions. I was in a 12ft boat which has a quick motion, and was handling the camera with one hand. I have no idea why the final scene is in soft focus....but it is still worth watching. Skipper of the boat was one of my sons, David.


Read More..

Three Days in Avalon

Weve had abnormally cold weather here in southern California in the last month so when the forecast changed to unseasonably warm conditions for the next few days we decided to head for Catalina. Departing Long Beach around 11:30 on Sunday, December 15th, we had a light northwesterly breeze for the entire passage.  About mid-channel we broke out the flare gun and fired off some expired rounds for target practice. Its a fun way to get rid of old pyrotechnics and gives the crew a chance to get familiar with them. Though we usually stay at Two Harbors or Emerald Bay, this time we chose Avalon because at this time of year the island is nearly deserted of tourists and its a perfect time to visit this quaint town.  We picked up a mooring on the west side of the small harbor and got the boat squared away just in time to relax in the cockpit and enjoy a spectacular sunset.

Finisterra in Avalon
The boat is nearly ready to head for Mexico so the dinghy and liferaft as well as the deck bags are all lashed in place. Over the next few weeks well make final preparations and provision for the first leg of the journey south which will take us first to San Diego, then Ensenada, Turtle Bay, Mag Bay, and on to San Jose Del Cabo at the tip of Baja California.

Avalon looks festive as the sun sets behind the hills.

The next day we went ashore early and wandered around town a bit. The atmosphere was more like a country village than the bustling tourist destination it is in the summer. It was a beautiful warm morning and we hiked up to the Botanical Gardens a mile or so behind the town. Our route took us up Avalon Canyon Road and along the way we passed the golf course. I was surprised to see that the horse stables that had stood for years next to the course had been bulldozed. I wonder what theyll replace them with.

By midday we were back in town and played a round of miniature golf before heading back to the boat. I love playing there and we do it every time were in town. The course is basically a botanical garden with greens. Its a tranquil place with lots of hummingbirds and other flora and fauna...much better than an amusement park setting. Back aboard Finisterra, we relaxed and prepared for another beautiful sunset and moonrise.

With the mainland in the distance, the moon peeks from behind a cloud bank.
For a few moments the moonrise looked like a sunset. 

The next day we took advantage of free tickets for a Humvee tour into the back country between Avalon and Little Harbor. The tickets were courtesy of the West End Cruising Club which we had joined a year or two back. I was eager to take this tour because its the only way, besides walking, to see the interior of this end of the island. The Island Conservancy, which manages about 90% of Catalina imposes strict limits on travel in this area. Our route took us up to the airport, which is located on a high point in the middle of the island, then across to Little Harbor and Ben Weston beach, and returned to Avalon via Cape Canyon Road.

The Carnival Inspiration 

By 0800 a cruise ship had anchored off Avalon and the shore boat fleet was busy shuttling tourists ashore so it was a good time to head for the hills, no pun intended. This is a weekly port call for the Carnival Inspiration which also calls at Ensenada and its home port of Long Beach. The ship will depart for Ensenada at 1700 and the town will revert back to quiet village mode until next Tuesday when the ship will arrive again.

The view from the airport road.

Looking northwest from the airport road toward Long Point.  

Bison are plentiful in this part of the island. Unfortunately Catalina has been suffering from drought in the last couple of years and water is scarce. The Conservancy has been placing water tanks at many of the natural ponds where there is usually water for the wildlife.

Female bison and their calves run in herds while bulls lead more solitary lives. This young bull is on his own.

Later we caught up with this small herd. The trail on the left is the Transcatalina Trail which runs from Avalon to Parsons Landing and on to the west end of the Island.
After we passed the airport the road turned to rough dirt and gravel so it was a bouncy ride past Rancho Escondido and on down to Little Harbor. The rancho, owned by the Catalina Island Company (the Wrigley family) has been converted from a horse ranch to a vineyard enterprise. They grow chardonnay, zinfandel and pinot noir grapes that are shipped to the Rusack Winery in the Santa Ynez Valley by air. There they are made into fine wines. We missed an opportunity to taste them, but learned that they are available at one of the restaurants in Avalon. We did have a fine meal at another new restaurant in town, the Bluewater, which also has quite a respectable wine list.


El Rancho Escondido was formerly a horse ranch specializing in Arabians. 

Its hard to imagine a more idyllic spot to practice the vintners art
From the vineyard of El Rancho Escondido we drove down to a point overlooking Little Harbor. It looks like its wide open to a southwesterly swell, but there is a protective reef that makes it a reasonably secure place to anchor most of the time. It was deserted on this day, but in the summer there are usually three or four boats anchored bow and stern in this tiny cove.

Little Harbor is the far cove. In the foreground is Sharks cove, which is one of the few places on the island that occasionally has ride-able surf. 
 From Little harbor we turned inland again and drove up Cape Canyon road. We passed the old abandoned coach house which was once a stopover for horse drawn coaches, then we stopped at the eagle sanctuary. Right now there is only a single Bald eagle and a Golden eagle in residence. This is a good thing, since the Bald eagles that live on the island are all healthy. The Bald eagle that lives at the sanctuary was permanently injured several years ago and cannot survive in the wild. The Golden eagle is the last of the breed to live on Catalina. They are not native to the island and now that there is a healthy population of Balds, they are able to keep the Goldens from reestablishing themselves on the island.

Cape Canyon Coach House
From Cape Canyon we drove up the dirt road to Blackjack peak. From there we rejoined the Airport road and returned to Avalon. Im not a big fan of guided tours, but this one was fascinating. If you like back country touring youll enjoy this one.

Finisterra at her mooring. The squid were running inside the harbor, which brought the sea birds and seals in to feast on them all around the boat. 
Wednesday dawned cold and blustery and it was time to get back across the channel before a predicted storm arrived, so we dropped the mooring and got shot out of Avalon harbor by a strong wind coming down the canyon. As the day wore on, however, the wind lightened and shifted around to a westerly direction and we had a delightful sail on a close reach back to Long Beach.

Read More..