Selasa, 31 Mei 2016

Building Forms


The basement exercise room became the room of choice for building the boat....never got any use as an exercise room anyway. I didnt want to tear out the carpet, so the old ping-pong table that needed to disappear became the foundation for my form. I reinforced the underneath side of the ping-pong table with 2x4s and by rotating each half 90 degrees I got a platform 4.5x10. I surrounded it with 1/4" scrap plywood used for floor protection in a former life and I was ready to go. We wont talk about what it took to clear the room out of all the accumulated stuff.


I decided to add 8" to the height of the form going to 32" rather than the 24" called out on the plan. I thought my knees would appreciate it. To support the stem and breasthook, I got a little creative with an extention off the platform to get the height and length needed. With the old stereo speakers now mounted up on the walls and out of the way, Im a-building and a-dancing.

Read More..

Shiny Stuff

I have been working with the pram cover maker to make the stainless steel tube frame to take the cover.  Normally he contracts this to a SS specialist.  He normally makes a light alli tube frame as templates then the SS guy does his bit.  Between us we have made the frame combining his know how and my metal skills.  This has saved over £500 in labour. So under the white cover at the back I now have a fully collapsible frame.  IMO the SS guy is on a nice little number.  The 316 SS tube was a dream to work. 

 The screen frame

 The front screen will be a self supporting structure.
More on this when it gets fitted

 Port side


The other shiny bits added are the mushroom vents.  Its one of those jobs I have held back to when I had nothing much else to.  Currently I am waiting for the internal doors and frames and the front doors.  I should get these next week.

6 fitted and one to do later once the hatch is finally fitted

If you look closely you can see the 3G aerial behind the 3rd vent.  The yellow bit is a cover blocking off the hole for the gas fire flue.
Read More..

Bulkheads

Monday 12th Nov 2007
Bulkheads front and back of the engine room.
As the hull is still floppy, it had to be jacked into the correct shape to fit the bulkheads.
Very slow to fit but a 100% fit makes the boat hull true to shape and is the basis for all the rest of it to follow.


BHD 8 fitted.


Big thanks to Paul for the 2 hours he gave us as we really needed an extra pair of hands.!

Interesting fact... the boat is now split into 3 compartments. You have to get off one bit to climb onto another as the bulkheads are so high !!.
Read More..

Fleet a Planing Hull Version of Flint

Back in about 2003 I was asked to design a rowing/small outboard boat for operations in a short, steep chop, with the emphasis on lack of pounding. The resulting boat, named Flint, has been very successful and popular. She is very easy to build - if you follow the assembly sequence - and a distictive feature of her hull is the fine, hollow sections in the forward part of the boat. What is amazing is that this shape can be produced from a single developed plywood panel. I have tried to achieve this sort of shape in the past using conventional projection of developable panels, but the geometry required to produce a hollow shape has always defeated me. The arrival of computer programs which have the ability to do the mathematics saved me from myself!

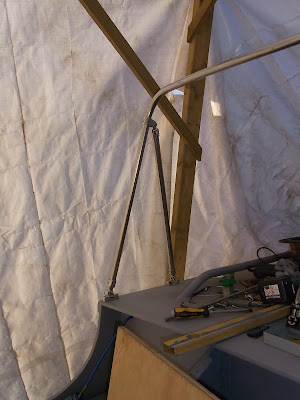
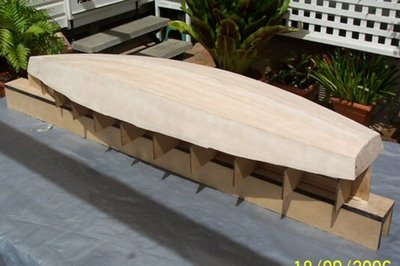
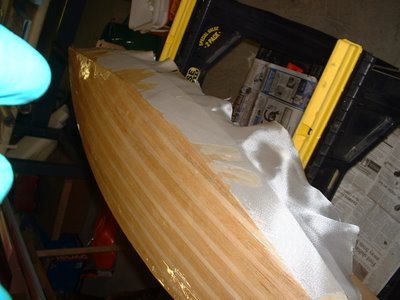
Proof that the hollow sections come from a single panel of plywood
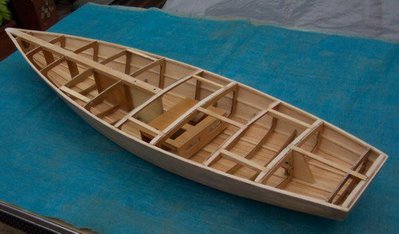
The very first Flint, built by Eddie Guy
In recent times I have been approached by a number of people who have wanted to build a planing version of Flint. The hull of the original rowing/sailing/small outboard version is of the displacement type, although her fine sections and high length-to-breadth ratio mean that she can be pushed faster than her theoetical displacement speed which is 5 knots. On launching day we got her to 6.1 knots with two adults and two teenagers onboard, using a 2hp Yamaha at part throttle. Steve Dorrington got his to a speed of 6.2 knots under the urge of British Seagull 40-plus - certainly an achievement!

Steve Dorrington measuring his 6.2 Seagull-knots using a GPS. Note how Steve has to sit on the midships thwart in order to retain proper trim. In the case of the planing version, a helms-person should be able to sit aft and operate the outboard without a tiller extension.
Bruce Erney, on the east coast of the USA modified his Flint to take a 6hp motor and got her up to 17 knots, I think, but he needed to put trim tabs on to overcome the tendency of the displacement hull to point her bow at the sky. I was concerned about the exercise, but Bruce had many successful trips while fishing in the big waters.

Bruce Erneys trim-tabs

One of Bruces many fishing trips in his modified Flint

Ive made a number of attempts at drawing a planing version of Flint and things were brought to a head this week when a friend/customer for whom I have great respect, asked me for a semi-disposable planing power boat which he and a friend could build over a weekend or two, to be powered by a 5hp outboard. He looked at few drawings I had on hand, and chose a preliminary sketch of a planing version of Flint, which I drew as a discussion piece for Rick Hayhoe a number of months ago.

Lines Drawing of the original Flint
Lines drawing of the planing version, now called Fleet
In the above drawings you can see the substantial changes made to the shape of the hull aft of the midsection. I have retained the fine, hollow forward sections, although Ive increased the rake of the stem very slightly in order to reduce the severity of the bending and twisting of the plywood panels. With good-quality ply the hull is easy to assemble, but some people still insist on using poor-quality sheets in order to save a dollar, and end up encountering problems - hence the alteration.

My aim with this design is to retain the extemely light and simple style of hull as seen with the original Flint, and to have her run efficiently with nothing larger than a 4hp motor. This is important in my part of the world because we can operate with up to, and including, 4hp without needing to register the boat. The customer wants to use a 5hp, and specifically asked for a water-shedding foredeck and side decks under which he can store fishing gear. He intends taking her into the open Pacific off the Queensland coast here in Australia, and so adequate emergency floatation is essential. His boat will have built-in buoyancy under the sternsheets (aft seating which extends aft in a horseshoe arrangement),  under the midships thwart, and under the large foredeck. We have not finalised details of the arrangement, but here is a very preliminary sketch with the decks and seating shown in blue.

Here is a very sketchy drawing showing one idea of an internal layout. The final version is a fair way off yet, I think. The decks have very pronounced camber to aid in water shedding (those odd looking bits at the bottom are just working drawings to establish the height of the inner edges of the side decks at each station). Note how the cambered foredeck makes the sheer look much flatter than in the undecked original - this is an optical illusion. 
This little article should give some indication of just how much the character of a boat must be changed when the mode of operation is altered. However, a completely open version with a very small motor may retain the spartan feel of the original, while still performing in the semi-planing and planing modes. When the plans are complete and the boat tested, Ill post more details. For those who want to read more about the original Flint follow this link and this link.


Read More..

Senin, 30 Mei 2016

Discussion about Flat Bottomed Hulls

As I expected, publication of an opinion on the subject of flat bottomed boats has resulted in some discussion. Graham brought up the matter of adequate rocker and running the forefoot above the waterline (see my previous post), and he used Phil Bolgers Black Skimmer as an example. Black Skimmer is one of my all-time favourite designs, by the way - I think she is a superb example of sophisticated simplicity, and even after thirty-one years of studying her shape and construction, I still find her to be awe-inspiring.

Here is a photo of Black Skimmer, copied from Woodenboat Magazine - I hope I havent infringed any copyright. She is close to being my absolute favourite design.
Dennis has written in with the following: -

Ross, I love it that you are discussing flat bottomed skiffs. I love em. My first sailboat was a Bolger Featherwind which exhibited the design principles you mention in your post. I am not so sure I agree about the curvature in bottom and sides. W/L length gets shortened, more of the bottom is exposed to waves and the pounding is obnoxious (this is not to say that the boat was not a blast to sail). How would John Atkins Lark (143" sailing skiff) stack up to your discussion? It has a fine entry, but the stem is immersed. It has good flare and I would bet that it does not pound the fillings out of your teeth while sailing in a chop. While I have not built and sailed another flat bottomed skiff since owning the Featherwind, I will probably do so one day because the nostalgia of that first boat has a powerful draw. Best, Dennis

I know what Dennis is talking about, and it is a good demonstration of how everything in boat design requires compromise. The shape which provides the excellent sailing behaviour (adequate rocker, matched curvature of the topsides and the bottom panel, forefoot run above the waterline) is very likely to pound badly when floating level.


There are plenty of flat-bottomed skiff designs around which have the forefoot immersed, and scores of William and John Atkin boats provide excellent examples to study. One of my favourite Atkin designs is Ration and she shows exactly what we are talking about.
Lines of Ration - courtesy of Motor Boatings Ideal Series - Chapman and Horenburger
Ration shows a rowboat which is less likely to pound in a small chop - immersed forefoot and very fine entry at the waterline and bottom - but she will still pound as soon as the waves get large enough to make the forefoot clear the water. The main problem is that the shape of the chine-line is such that there will be turbulence formed as the water running around the sides at the bow inevitably runs down and across the chine, and subsequently runs back across the chine in the aft sections (although this will be less of a problem than at the bow). A mitigating factor in this design is that the boat is relatively slim. It is in wide, flat boats that the problem is at its worst, causing excess drag and wild, unpredictable steering - particularly downwind.


To get an appreciation of what Im trying to describe, compare the shapes I show below: -

A typical flat-bottomed skiff with the heel of the stem immersed, and the bottom of the transom coming to above the waterline. Im only showing the body plan here, but the boat Ive drawn as the example is fairly long and slim.
The same boat heeled 25 degrees. In reality, the stern would probably be forced a bit higher and the bow lower than Ive shown here, which would make matters even worse.
A clearer view of the same boat. See how the chine line will generate turbulence and drag, and will tend to force the boat to round up.
For comparision, here is the underwater shape of the example I drew for the previous posting. While this is not a perfect shape by any means, it is vastly superior to the example shown above - but it will pound more when flat in a ripple.
It is all a matter of degree - the Featherwind mentioned by Dennis shows close to the ultimate in matching the curve of the topsides and the bottom - at least for a sharp-bowed boat - but she is best used as a sailing boat, or a rowing boat on flat water.
Read More..
Dave Mainwarings definitions

HULL defintion of:
The outer shell, including frames, ribs, interior bulkheads, exclusive of masts, rigging, deck and equipment.


"bare hull" defintion of:
A model boats outer shell, EXCLUDING, ribs, interior bulkheads, exclusive of masts, rigging, deck and equipment. Example. A fiberglass hull as pulled from a mold.

--

A wooden hull:
one constructed of wood (including plywood).


--
A glass hull:
one constructed of reinforced plastic (cloth impregnated with resin). Nominally referred to as a fiberglass hull.

--
A composite hull:
a hull constructed of wood and covered with reinforced plastic (cloth impregnated with resin).
OR:
a hull constructed using a laminate (sandwich) consisting of reinforced plastic (cloth impregnated with resin) on two sides of a core . Core materials may be foam or wood.
Read More..
One of the great joys of owning and/or building a small wooden sailing boat is that there is plenty of opportunity for experimentation. For some reason it doesnt seem right to go shifting things around on a glass production hull, but wooden boats lend themselves to modification. With high-quality epoxy and fastenings, the end result should be as good, or better, than the original work.

Ive mentioned previously that rig modification was something which interested me from before I left school. I had been brought up sailing racing boats at the local club, all of which had modern, deck-stepped rigs with lots of stainless-steel fittings and sails full of batten pockets. Although I loved the sailing, I felt the urge to cruise alone in a boat fitted with a more simple, traditional rig such as a standing lugsail.

Phoenix at about age 20 with her original rig
For me, the first real experiment came when I converted the cruising dinghy my Dad had designed and built. She had been constructed with a deck-stepped Bermudan rig just like all of the racing boats Id sailed. She was (and still is) a fine boat, but I got it into my head that Id re-rig her with a Chinese Lugsail (a.k.a. Chinese Junk Rig). I spent a long time on the calculations - far too long, I believe - but that was because I didnt really know how accurate I had to be with all of the proportions, and I was particularly concerned about the location of the centre-of-area of the sail in relation to the centre-of-lateral resistance of the boat.
Phoenix showing how well she could get to windward with her Junk Rig. A nice day in tropical North Queensland.


Accelerating out of the tack and heading off hard on the wind. This rig was exceptionally easy to handle, reef, and furl, and has been one of my all-time favourite rigs. I will be making another one sometime...

After the Chinese Lug rig, I fitted the same hull with about four or five other sail configurations, finally settling on the Balance Lug which she currently carries.

When I designed boats such as Phoenix III, First Mate, and Periwinkle (and some others which have not yet been published), I decided from the outset that I would arrange the rig proportions so that several different rigs could be used on the same mast(s) and/or using the same mast step and partners. This results in boats which can be rigged in a number of different ways without having to make any physical alterations to the structure of the boat. I have already spoken about this a little in my post about Phoenix III and the Perfect Customer 

Here are some more photos to illustrate what I mean.
John Shrapnels Periwinkle showing her standard Cat Ketch (Periauger) rig. Crew weight is a little far aft, but she is going nicely. This boat is very fine up forard, and needs to have weight kept out of the bow when pressed.
Same boat, but with the mizzen removed and the mainmast and mainsail moved aft to another mast step and partner. The rig is still perfectly well balanced, even though the 51sq ft mizzen has been removed entirely.
Here she is with just the mainsail up, stepped in the middle location, but with a substantial reef tied in. It may look calm in the little bay, but it was blowing outside on the more open water.
When it really starts to blow, or when the crew weight is low, you can set the mizzen in the central location. Once again the hull balance is fine, but the rig has been reduced to a snug 51 sq.ft. Even so, when this picture was taken, the boat was doing 8 knots by GPS! If you needed to , even this sail can be reefed.
This shows you the rig combinations on paper. Note how well the centres-of-area cluster near the centre-of-lateral resistance of the hull in all combinations. The key to this was careful proportioning of the sails and the mast locations.
This is another rig which can be used on the boat. The little flying jib is optional, but will help her a lot and will stand ok without shrouds or backstays. The gaff-headed cat rig is set on exactly the same mainmast as in the standard rig, so there is no alteration required to any part of the boat. This print is of an early sketch and some elements are not shown.
...and her you can see Graham Faulkners Periwinkle with the Gaff-Cat rig, beachcruising on Fraser Island, Queensland, Australia (this was the second boat built, and Graham even made his own sail!)
This shows the three mast locations - the mainmast partners in the lower/left of the photo, the central position through the main thwart, and the mizzen partner through the stern sheets (aft thwart)
All of that thinking made me very tired! Actually, that is just me showing the comfortable sleeping position on either side of the centreboard case.
Build yourself a wooden boat, and then try some rig experiments - it is great fun.
Read More..

Minggu, 29 Mei 2016

It has been very busy as evidenced by fewer postings. We have launched a new website for the CNC Boat Kit business www.CNCboatkits.com

ClintChaseBoatbuilder.com will feature the boatbuilding, mast and spars, and oars work.

One of the most important details in a good CNC kit is working out the NC scarf. Here is a CNC router cutting some test scarfs.

style=clear:both;float:left; 

The router above is using a 1/4" bit to follow lines of code generated by computer software. The code is specific to a .dxf file for the part, in this case a scarf joint.

style=clear:both;float:left; 

The dogbone shape you see is the key, literally, in that it locks the scarf together and aligns the entire plank. When a builder receives a kit, all the planks are precut to the precise spile and sweep of the plank but it short segments. To preserves the proper shape, this NC scarf needs to be right on the money.

style=clear:both;float:left; 
Posted


The beauty of this scarf is that it is blind, covered up by the outside plys so that it is not seen from the outside. This would be especially important for varnished planks.

We are very busy getting ready for the 2010 Maine Boatbuilders Show in less than a week! We will be in building #2 on the left as you enter from the main entrance direction.
Read More..

The broken technology icon

Here it is, a little icon, a crossed wrench and screwdriver that means something, I dont know what exactly.  I think it might mean that by clicking it, I can mess with the technology enclosed in the box that its in the lower right hand corner of.
But I think of it as the broken technology icon.  And for some reason, it reminds me of the hammer and sickle icon that the Soviets used on their flag.  In their case, it meant that their state was one of industrial workers and farmers.  In this case, the wrench and screwdriver supposedly stand for tools you use to take apart machinery and potentially put it back together again.  OK, enough already with the semiotics.
Read More..

Building the RSJ Frame


In August we built the Frame to build the boat on,


Steel supplied locally and built on our own steel deck staging as we havent level ground anywhere.


Read More..